


Welcome to my another technical blog post. In this blog post, I amgoing to show you how to crop a screenshot on mac or how to take a screenshot on mac. Hope you will enjoy our tips and tricks. Sometimes we’re capturing images and the recipient fails to read the manual or just shows absolutely no appreciation for the highly technical post. What then? The usual answer is to clean it up but that’s a pain.
How to take screenshot on mac
To take a screen capture, press SHIFT-COMMAND-3.
You’ll see a thumbnail toward the side of your screen, which you can snap to alter.
In any case the screen capture will basically be saved.
How to capture portion of screen on Mac
To catch a piece of the screen, hold SHIFT-COMMAND-4. A crosshair will show up, which you can haul to choose the area of screen you need to catch. To move the whole determination, press and hold the Space bar while hauling. What’s more to drop your screen capture, just hit the getaway key.
How to screenshot a window or menu on Mac
To catch a solitary window or menu, press SHIFT-COMMAND-4-SPACE. The pointer will change to a camera symbol, and the window being caught will be shown. To drop this screen capture, press the getaway key. On the other hand, click the window or menu to screen capture it. You can likewise avoid the window’s shadow from the screen capture by squeezing and holding OPTION while you click.
Where to find screen captures on Mac – where are they saved?
MacOS saves screen captures to the work area of course. On the off chance that you’re utilizing macOS Mojave or later, you can change the area. Go into the Screenshot application and afterward enter the Options menu to change the save organizer.
Instructions to screen capture on Windows PC
There are loads of various easy routes you can use to take screen captures on your PC.
Squeezing the PrtScn button duplicates your whole screen to the clipboard. You can then glue this screen capture into different projects. On the other hand, you can squeeze Alt + PrtScn to duplicate your dynamic window, rather than the whole screen.
Assuming you press the Windows key, Shift and S, you’ll have the option to drag the pointer to choose a region of your presentation to screen capture.
What’s more in the event that you press the Windows key and PrtScn, your whole screen will be saved as a picture document in the Pictures organizer. There’s additionally an application on Windows 10 called Snipping Tool that you can use to take screen captures.
To take the screen capture, discharge your mouse or trackpad button.
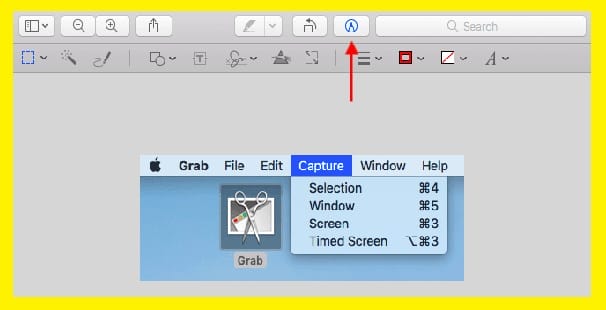
In the MacOS screenshot, the grabber for the clipboard is the Image Capture dialog. It offers to clean the image using the built-in editor, or to crop it using the various tools that are included. And it’s a natural thing to do – if you crop an image, you might be able to get the end off of it if you couldn’t find a cut point and you can leave it at the crop position instead of scanning back up. But a better approach is to ask Siri for help.
We’re testing new Macs to try to find the right button. First, she made me take a picture of my mouse – no, I didn’t need that – so now she’s shown me a couple of new ways to crop screenshots.
The first is about the worst. There’s no convenient pop-up that shows how this is done and it has a terrible icon. There are no tools available to edit what’s been cropped and there are no options to provide a bit of extra information.
It’s actually pretty good at crop but it doesn’t take much to get it wrong. Take a close look at the problem image, if you don’t believe me, I’ve saved it and you can download it.
I expect this one would be much better if you had an icon to confirm you’ve saved it as a PNG and it’s surely something that Apple should be enabling on macOS. At least tell me you’ve sent it, so I can say thanks in a web interface.
So that’s the worst approach. How about the second?
The second approach gives a great result.
The image quality is pretty good and the tool is easy to use. You can drag the handles to slide the crop mark a little or a lot but I don’t find this useful because you can also use your keyboard.
My only quibble is that you don’t get any indication that you’ve been cropped. Yes, you can see the arrow points to the bottom right of the image but you don’t know whether you’re cropped in a 12-inch circle or an 18-inch circle. It’s enough of a change that I don’t notice a difference but I think it’s a really good tool for those times when you’re quick on the draw and want to avoid cleaning up.
To be clear: this is not my image (I use it to give the impression that I’m using a Mac for this – I do own a Mac for the specific purpose of looking at screenshots). My computer isn’t showing off its low-res resolution with a giant poster of my monitor on the wall.
You should go and download the version of this tool from the Mac Store. I’ll test it and post a full review in due course.
Support Tech ARP!
If everyone who reads our reporting, who likes it, helps fund it, our future would be much more secure. For as little as $1, you can support the IAPs of our iPhone and iPad readers, help us continue to bring you the latest news, analysis, and competitions.
This is a very useful little tip that I picked up from some blogger at XDA Forums. Ever since I got my first macbook pro, I’ve had a habit of using the window’s screenshot feature to print images of applications and other software that I like. Although I do use Photoshop occasionally for editing, I mainly use image editing software on my macbook pro, so I don’t take screenshots on there very often. Recently I was using a saved screenshot on my macbook pro to check some of my facebook friends’ profile pictures and saw the following:
Although my whole screen was black, the area that was visible above the green bar had red bars with a completely different shade of green. Since this is a relatively uncommon occurrence, I grabbed a screenshot of the area above the green bar. I printed it out and compared it to my original screenshot:
This is a pretty clear difference, so the green bars on the picture should be closer to the original screenshot than the red bars were on my screenshot. After doing a lot of editing, I found this image:
Now you can see why I had trouble figuring out what was going on in my original screenshot. In the area where the green bars should


